Start & Thumbnails#
Start of Session - Find Pairs#
Choose the working folder and a list of images to process (it is possible to select a subset of the images
as will be explained later)
For the first time click on <Files> <Find Pairs>: 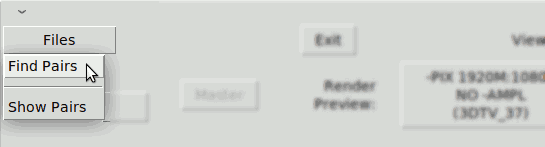
This command searches the image files in the working folder and presents a list of generic types, of which we can select all or some of them.
It is not always convenient to include all the images in the list of generics. Most often when there are RAW files, it is interesting to make Stmani3 to show the RAW, but not the child images (developed, or images with development parameters like the ones of LightZone)
Stmani3 does not process RAW files (in this version it can only open JPG images). In spite of that it is convenient to select the RAW as the main image files. Stmani3 will take automatically the corresponding developed JPG if it exists. If it did not exist it would take the RAW internal preview.
NOTE: The preview image of the SAMSUNG NX1000 RAW's is identical to the JPG generated by the camera, therefore the JPG's of the camera can be erased safely. In other cameras the preview image is smaller than the generated JPG.

After clicking "Confirm" the program generates a text file with a list of the image files. The first time of invoking "Find Pairs" the name of the file is "lista_pares_000.lstpair". The next time of invoking the name will be "lista_pares_001.lstpair" and so on. This way the older files are not erased.
Start of Session - Show Pairs#
After a "xxx.lstpair" file is created, next sessions may be started by clicking <Files> <Show Pairs>. This will show the image thumbnails according with the contents of the *.lstpair file.
When the user changes the image arrangement, e.g. invert image pairs, associate, disassociate, et al., a new xxx.lstpair file is generated. But it will keep the same when the user erases images in order to keep track of them in further sessions. The xxx.lstpair may be updated by clicking again <Find Pairs>
Image Selection#
When one or two thumbnails are selected their images are shown in the viewing area.
There are two modes of selection:
- "Paired"
- "Random"
By right-click over a selected thumbnail pair the program will offer several options:
    INVERT    TRASH    RECOVER   ASSOCIATE    DISSOCIATE   AUTO   COPY   PASTE
                                                          ALIGN
Only some of the options will be available depending on the "Paired" or "Random" selection mode and other situations.
The options that modify the pair arrangement (INVERT, ASSOCIATE, DISSOCIATE) and the "MASTER" command (covered later), will create a new "xxx.lstpair" file. If the last file was, say, lista_pares_016.lstpair, then the created new one will be named lista_pares_017.lstpair.
The INVERT, ASSOCIATE, DISSOCIATE commands do not change anything in the image files, only the contents of the "xxx.lstpair" file. Also in the case for .MPO images ("xxx.lstpair" identifies the internal images by their (0) (1) MPO buffers)
TRASH sends to the system's trash the pair of selected images, and the associated .pair file if it exists.
If the images are RAW the TRASH command erases also their child's: developed and parameter files.
The TRASH command does not update the "xxx.lstpair" file, which enables to keep track of erased files
at least until a new "Find Pairs" command.
The trashed images are shown as thumbnails dashed with a cross. They could be recovered with the RECOVER
option, or recovered directly from the system's trash.
Paired Mode#
In "Paired" mode when clicking over one thumbnail it selects the automatically the one beside, even in case
one of them did not exist in which case two identical copies are shown:
Random Mode#
In "Random" mode it is possible to select the pair of images intended for the right and left eye from any position
in the thumbnails.
- To select the photo to be seen by the left eye, set the toggle button L/R in "L" (red colour).
- To select the photo to be seen by the right eye, set the toggle button L/R in "R" (cyan colour).
Automatic pairing#
The button "MASTER" activates in Random mode when there are two selected photos which are not paired as shown in the image above.
By clicking "MASTER" the program searches among the non paired images for pairs of photos that have the same time
difference as the selected pair, plus or minus a tolerance that is asked by the program.
If the selected pair was a good stereo pair, the pairs found by this process will most likely be.
Single Images#
Single images can make valid stereo pairs in Stmani3, even if they are plain 2D without any depth.
Plain 2D#
A plain 2D image will appear as a single thumbnail in one side or the other (it doesn't really matter), while in the Viewing Area
it will appear as two identical images.
Stereo alignment does not make sense in 2D photos, however it is possible to manually rotate the photo, modify margins et al., in
the same way as if it were a normal stereo pair. This is useful to include occasional 2D images in stereo slide-shows.
See operations explained in Angular Alignment.
To do this it is necessary to place two matching points in the images (the correlation should be always 100% because the images are
identical).
The process will generate a .pair file as if it were a normal stereo pair, which will then allow to render to any stereo format: SBS, MPO, et al. Note this is not very efficient as it implies two identical copies of the 2D photo, so it is only recommended to include a few 2D's into
an otherwise stereo slide show.
Stereo Card Scan, Tri-Delta#
Here the two sides of an stereo view are in the same image.
Same as for Plain 2D, when first selected they appear in the Viewing Area as two identical
copies of the double image Stereo Card or Tri-Delta.
To process these files in Angular Alignment:
- If it is a Tri-Delta it may be necessary to modify first the Orientation of each side.
- Create a Matching Point over the right and left sides. After this is done the Viewing Area stops showing two identical copies of the dual image and start showing the right and left sides. Now it can be aligned as a normal stereo pair.
The following animation shows how the introduction of a first matching point tells Stmani3 that a single image is actually an stereo pair:
Group Options#
It is possible to do some operations over a several pairs of images that are marked using the tick box beside.
Group operations are only possible in "Paired Mode".
The following options are shown by right clicking over the heading of a column of thumbnails:
   EXIF   CHANGE    CHANGE  CHANGE     CHANGE    AUTO     INVERT   GENERATE
  TITLE    DATE      NAME   FOCAL   TEXT FORMAT  ALIGN             *.DESCR
Changing the Title, Date, Name and Focal modify the metadata of the image files, but not the image itself.
Auto-Align finds automatically a set of matching points, makes an Angular Alignment of the stereo pair and generates the *.pair side-car file. See Automatic Alignment
Generate *.descr creates an XML .descr file in XML format, which is essentially a list of .pair files. It is necessary for rendering images in batch mode using the program gen-render.py (see Batch Rendering)
Viewing#
Viewing Tabs#
The selected thumbnails are shown in the viewing area that has three possible tabs:
| "Rendering" | "Basic View" | "Angular Alignment" |
|---|---|---|
| For Interactive Rendering | Simple view of Angular Alignment | For Angular Alignment work |
| Interlaced, Anaglyph or Single View | Parallel or Crossed View | Parallel or Crossed View |

Zoom#
| "+" Key | Zoom images in |
| "-" Key | Zoom images out |
| "X" Key | Fit to window (Minimum size) |
| "Z" Key | 1:1 Original size (Maximum size) |
Pan#
| Mouse drag over the right image | Pans left & right images together |
| Mouse drag over the left image | Pans only the left image |